
CSpeak - Installation Guide
Hardware and Software Requirements
Included below are the minimum requirements for CSpeak to run. Please note that some workflows may require higher resources and that not all combinations of hardware and software have been tested by Clinically Speaking. For more information, please contact Clinically Speaking Support.
A full 32 or 64-bit Windows operating system that is currently supported by Microsoft.
Specifically, this includes Windows 10, 11 and server 2016 or newer.
It is highly recommended that you always have the latest service packs and security updates in place.
Dot Net framework v4.8.
A minimum processor speed of 1.7 Ghz.
It is highly recommended that you have a processor capable of speeds greater than 2.6 Ghz for the best experience.
A minimum of 512 MB of RAM.
It is highly recommended that you have 2 GB of RAM available for the best experience.
A minimum display resolution of 1280x1024 pixels.
Download the CSpeak Installation Package
To obtain a link to the latest CSpeak installation package please visit the CSpeak Resource Center.
Preparing the CSpeak Installation Package
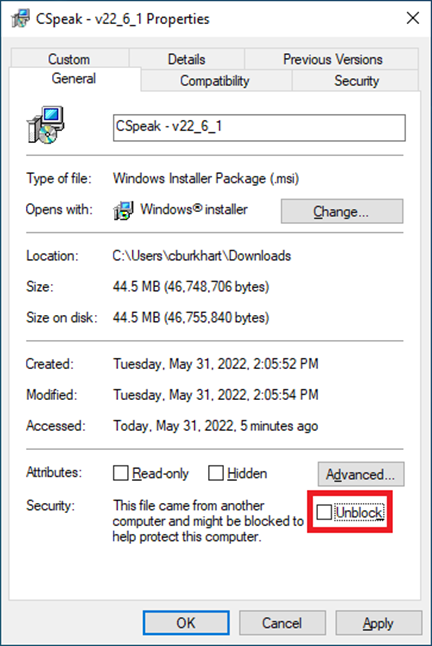
Once you have downloaded the installation package, please open Windows explorer and navigate to the downloads folder. Locate the downloaded installation package and right click on it. Select properties from the context menu shown on screen.
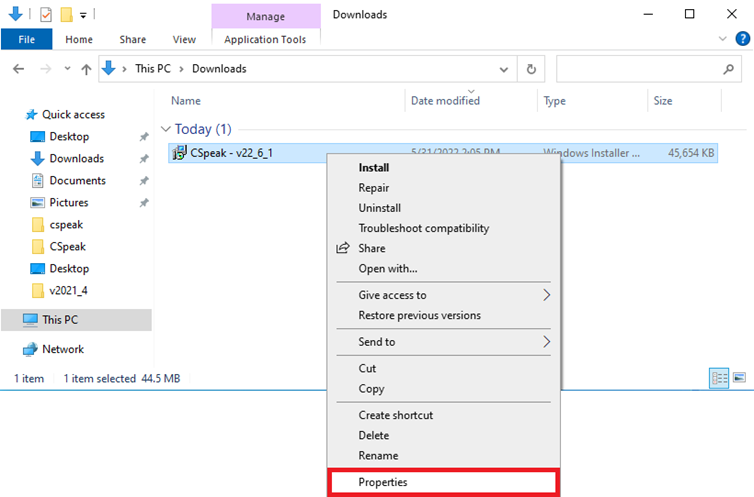
Once the properties window appears please check the unblock checkbox and click apply and ok.
Installing the CSpeak Client
You are now ready to install CSpeak. Double click on the installation package to begin the installation process. The setup process is self-guiding and requires no information on the part of the user performing the installation. The only requirement is that the user performing the installation must be able to run programs with administrative access on the device. Failure to do this may result in malformed installations or a complete failure to install at all.
Updating the CSpeak Client
The CSpeak client is installed using a MSI installer. This allows CSpeak to be upgraded in place by launching a newer MSI installer. If you need to update CSpeak, please download the latest CSpeak client from the resource center and run the MSI in the exact same workflow that you would for a normal installation.
Launching the CSpeak Client
After the installation has completed you can find the CSpeak shortcut inside of the start menu. The start menu icon can be translated to a desktop shortcut or pinned to the taskbar to provide access to CSpeak in your preferred way.
Elevation
Some systems are more restrictive than others. If you can, please make sure you run the CSpeak client using the flag, “run as administrator”.
Anti-Virus & Anti-Malware Considerations
To avoid issues related to performance and cross-process operations, it is required that any anti-virus or anti-malware scanners exclude or ignore the directories created and maintained by CSpeak.
Folder | Description |
C:\Program Files (x86)\Clinically Speaking | The root program files directories for all Clinically Speaking applications. |
C:\ProgramData\Clinically Speaking | The root program data directory for all Clinically Speaking applications. |
Folder Permissions
As part of the installation process, CSpeak will create and attempt to assign the appropriate permissions to the folders that are necessary for CSpeak to function correctly. CSpeak requires read, write, and modify access to the folders that it creates and maintains. If your organization has strict policies on folder permissions, you may need to add the appropriate permissions on the folders below.
Folder | Description |
C:\ProgramData\Clinically Speaking\CSpeak | The root program data directory for all Clinically Speaking applications. |
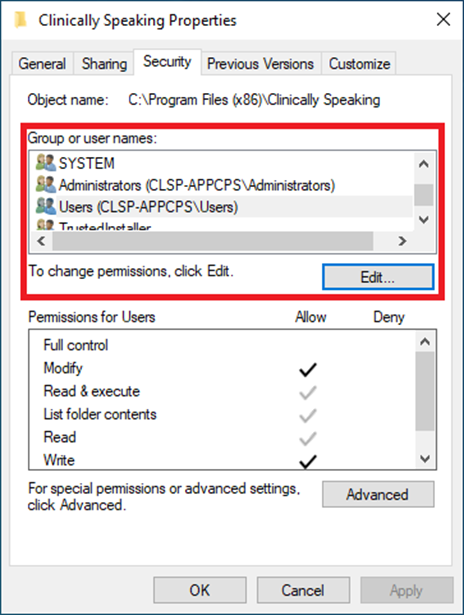
How to change permissions on a folder
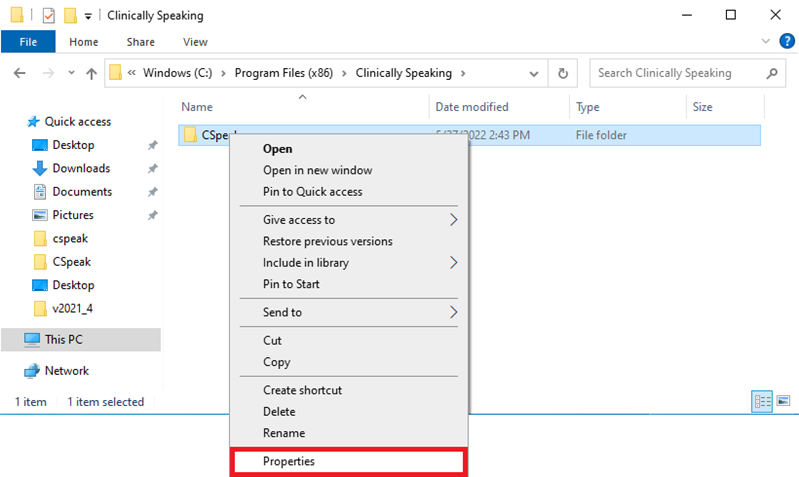
To change the permissions of a folder, please open Windows Explorer and navigate to the folders location. After you locate the folder, right click on it, and select properties.
When the properties window appears, select the third tab, “Security”. Under the group or usernames list box please select the appropriate group and click the edit button. If you are not sure which group to select, it is recommended that you select users or domain users.
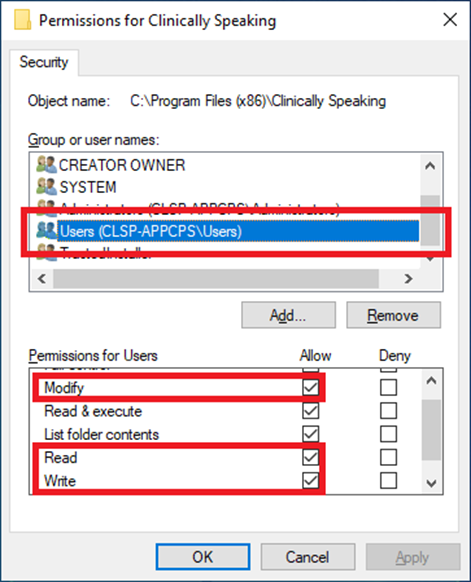
When the permissions window appears, select the same group or username, and make sure that the read, write, and modify permissions are all checked under the allow column. Alternatively, you can check full control. Once you have the permissions set correctly, please click apply and ok. You can now close out of the properties window.
MSI Installation Options
Going forward it is the intent of Clinically Speaking to provide our .NET applications through MSI installation packages. This is being done to help organizations to better maintain their installations and to help with mass updates.
Standalone Packages
In the past we near-exclusively provided our .NET applications as standalone packages that could be deployed. We are encouraging groups to avoid this practice going forward as this means of distribution was prone to causing user generated issues in the form of corrupted installations. The MSI installer provides an automated way to manage an installation and allows us to standardize more of the deployment to help with technical support when needed.
Command Line Options
The MSI installation package is designed to work with the common msiexec command line parameters. For more information on msiexec or the parameters available please visit the Microsoft Documents website.
Microsoft Edge WebView2 Runtime
The What-Can-I-Say window requires the Microsoft Edge WebView2 runtime to display content. This runtime is included with most Windows 10 or newer installations. If your installation is missing this runtime, you can download it directly from Microsoft.
Email Communications
To ensure you receive all relevant communications from Clinically Speaking and AppLink, please make sure your email system allows emails from no-reply@clinicallyspeaking.net.
Service Endpoints
CSpeak is powered by the Dragon Medical SpeechKit. The SpeechKit requires a small set of service endpoints. Please ensure that your network infrastructure allows traffic to, “nuancehdp.com”, and any subdomains and to, “applink.azurewebsites.net”. If your network infrastructure only works with IP addresses, please visit the service endpoints list webpage, or contact Clinically Speaking Support. Please note that some of these service endpoints may not be discoverable by ping or HTTP request.
Latency
A common support question is what constitutes, “good”, speed. This is slightly subjective, but in general we advise that good latency is a connection speed of 0-200ms from CSpeak to any service endpoint. A latency of 200-500ms is acceptable latency. Any latency greater than 500ms is considered bad. With acceptable latency it is expected that dictation results will return within 3-5 seconds after an utterance is closed.
Environment Specific Considerations
In many medium to large organizations, the use of server and virtualization technologies is common. To provide the best experience in these environments, please refer to the sections below to make sure your environment is setup correctly.
Latency
Regardless of the server and virtualization technology used, the latency between the local device and the server should never exceed 50ms. If your environment cannot meet this requirement, it is strongly recommended that you use PowerMic Mobile to avoid internal audio exceptions.
Remote Desktop Services
CSpeak can be accessed through the Remote Desktop Connection (mstsc.exe) application. When accessing CSpeak through Remote Desktop Connection application there is some additional steps that are necessary to support this platform. Alternative applications like the Remote Desktop application are not expressly supported by Nuance and functionality may vary if you choose to use those applications. In those cases, it is strongly recommended that you use PowerMic Mobile.
Audio & Microphone Extensions
To provide the best performance possible, a custom audio channel is highly recommended for this platform. For the microphone button events to be detected by CSpeak a virtual channel must be installed to send the events over the connection to the remote server. The latest RDS extensions can be found in the downloads center.
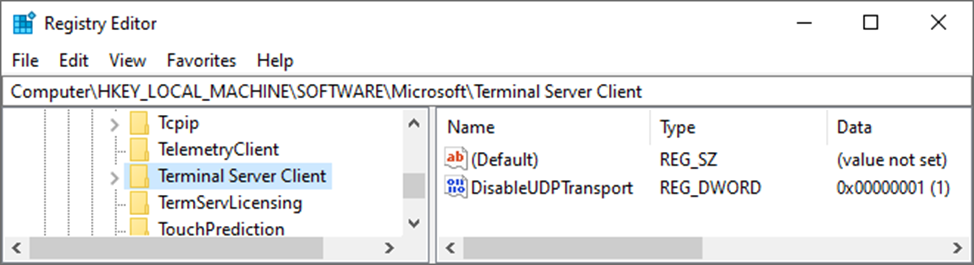
Disable UDP Transport
The terminal server client must have UDP transport disabled. To disable this feature, you will need to add or modify the DWORD, “DisableUDPTransport”, to have a decimal value of 1 on the following keys…
HKEY_LOCAL_MACHINE\Software\Microsoft\Terminal Server Client
HKEY_LOCAL_MACHINE\Software\Wow6432Node\Microsoft\Terminal Server Client
Citrix
CSpeak can be accessed through the Citrix Workspace application (v18.9 or higher). The supported server components are Citrix XenApp/XenDesktop (v7.15 or higher) and Citrix Virtual Apps/Desktops (v1808 or higher).
Audio & Microphone Extensions
To provide the best performance possible, a custom audio channel is highly recommended for this platform. For the microphone button events to be detected by CSpeak a virtual channel must be installed to send the events over the connection to the remote server. The latest Citrix extensions can be found in the downloads center.
Virtual Channels
Starting with Citrix Virtual Apps/Desktops v2109, the policy, “Virtual channel allow list”, is enabled by default. This means that the virtual channels and extensions are disabled by default. To resolve this, you can either disable the policy or add the Nuance virtual channels to the allow list. For more information please see the Citrix documentation.
VMWare
CSpeak can be accessed through the VMWare Horizon Client (v5.2 or higher). The supported server components are VMWare Horizon View (v7) and VMWare Horizon View Agent (v7.10 or higher). The supported protocols are PCoIP, Blast Extreme, and Real-Time Audio-Video (RTAV).
Audio & Microphone Extensions
To provide the best performance possible, a custom audio channel is highly recommended for this platform. For the microphone button events to be detected by CSpeak a virtual channel must be installed to send the events over the connection to the remote server. The latest VMware extensions can be found in the downloads center.
Device Splitting
In some cases, such as with thin clients, the ability to install the audio and microphone extensions is not available. In these situations, it is recommended that you use the native audio channel combined with device splitting. Please refer to the documentation provided with the extensions for the device-specific strings needed to configure device splitting.